In this guide
A good job search isn't only about sending more applications. It's about knowing what you sent, where, and what happens next. An application tracker turns scattered tabs, half-finished drafts and forgotten follow-ups into one list you trust. The hard part isn't starting one. It's setting it up so you keep using it in week six.
The short version
- Set up your tracker before the first application, and record only the fields you'll actually update.
- Use a few fixed stages and give every live job a next step with a date.
- Review the whole board once a week. That's where the patterns show up.
Why an application tracker improves job search organization
Most job seekers don't lose ground for lack of effort. They lose it because the process is in pieces: one resume in a folder, a tailored copy in Downloads, a recruiter's reply in the inbox, a follow-up date that never made it to the calendar.
An application tracker gives you one source of truth: where you applied, which resume you used, what stage each job is at, and what you'll do next. That matters most when several applications are moving at once. A tracker you keep up gives you:
- Every application in one view
- Follow-ups that happen on time
- A record of which resume version went where
- A head start on interview prep
- Something concrete to plan your week around
Step 1: Build an application tracker before you start applying
Set it up before the first application goes out. Backfilling ten or twenty jobs later is tedious, and that's when details get lost.
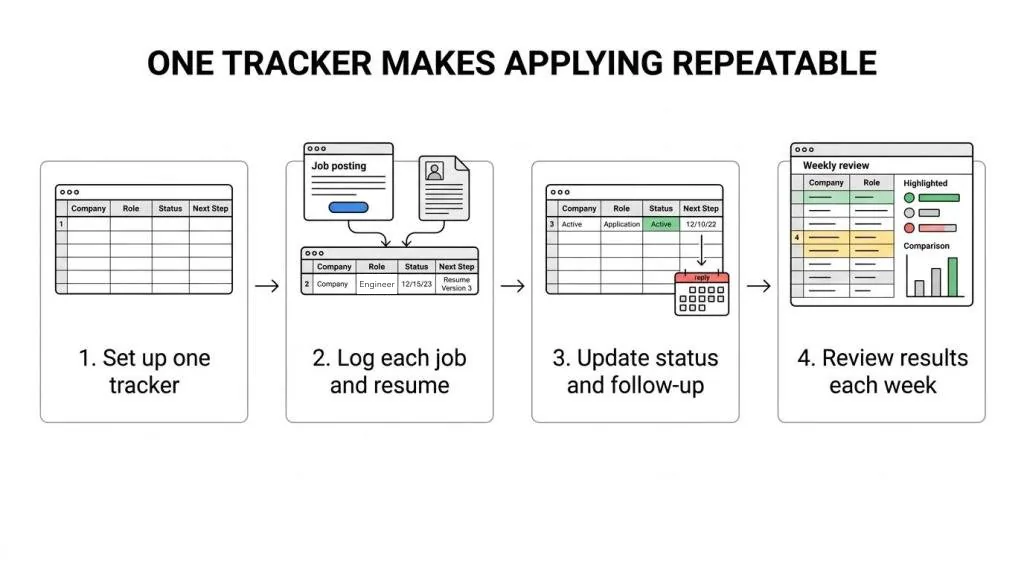
A spreadsheet works. A dedicated tracker can work better if it keeps the posting, your resume and your next step together. Either way, it should answer three questions at a glance: what did I apply to, what did I send, and what happens next?
Resist adding columns you won't fill in. These cover most searches:
The ATSPrep tracker has all of these fields built in. Only the company and job title are required, so adding a job takes seconds.
| Field | What to record |
|---|---|
| Company and job title | Exactly as the posting has them |
| Posting link and description | The link, plus a copy of the text in case it's taken down |
| Stage | Saved, Applied, Interviewing, Offer or Closed |
| Date applied | The day you sent it |
| Resume version | The exact version you sent |
| Next step and date | What you'll do and by when |
| Contact and notes | Recruiter name, salary range, referral, interview details |
Step 2: Track the details that actually change your results
Many trackers stop at company, role and date. That's enough to count applications, but not to learn from them.
Start with the resume version. It's one of the most common points of confusion in a busy search. If two similar jobs get different results, you need to know whether you sent the same file, a lightly tailored one or a full rewrite. A short note on how well it matched the posting helps too. Small notes like strong keyword match or needs better project examples become useful after a few weeks.
Save the job description with each job. Postings come down once a role closes, and you'll want that text when an interview is booked. For each application, record:
- Resume version: the exact name of the version you sent.
- Tailoring: general, lightly tailored or heavily tailored.
- Match: how well the resume covered the posting's terms.
- How you applied: company site, recruiter email, referral or job board.
- Next step: follow up, prepare for a screen, send a thank-you, or close it.
Step 3: Connect your application tracker to resume tailoring and ATS checks
A tracker gets more useful when it's linked to the quality of what you send, not just the fact that you sent it.
In ATSPrep, each job card has a Tailor button. It opens the Studio with that job's posting in Job match, so you can see which of its terms your resume covers while you edit. Changes you make there are noted on the job. When you download your resume, the Studio offers to mark the job as applied: it moves the card to Applied, saves that exact resume as a version named after the job, and links it as the resume you used.
Before you send, check the file reads cleanly. The free ATS checker shows the text a parser pulls out of your PDF or Word file, in order, without uploading it. The workflow then looks like this:
- Add the job and paste the posting.
- Tailor your resume against it.
- Check how the file reads back.
- Download it and mark the job as applied.
- Set the next step and its date.
Step 4: Use clear status stages and a follow-up routine
A tracker only works if every job has a current stage. Labels like in progress or waiting create clutter. A short, fixed list makes it obvious what needs attention.
It's tempting to add a stage for every interview round. Fewer stages hold up better. The ATSPrep tracker uses five fixed columns: Saved, Applied, Interviewing, Offer and Closed, and a closed job records whether you were rejected, got no reply or withdrew. Interview rounds go in notes.
Then give every live job a next step with a date. That turns a static row into something you'll act on, and the card shows when it's due or late. If a job sits in Applied for 7 days with nothing planned, the tracker asks whether to follow up. At 30 days it suggests marking it as no reply. It doesn't send emails; the prompts show when you open it. A weekly follow-up list might cover:
- Applications sent about a week ago with no reply
- Recruiter conversations waiting on an answer
- Thank-you notes after interviews
- Jobs where you need to gather prep material
Keep follow-up notes short. A line like followed up after the screen, waiting on the hiring manager is all you need.
Step 5: Review your application tracker weekly and adjust your strategy
The weekly review is where a tracker earns its place. Set aside time once a week to go through every live job: update stages, add notes from calls and emails, and close out the ones that have gone quiet. Then look for patterns.
The tracker's Insights view helps here. It charts where your applications went, from applied to interview, offer or no reply, and shows how many you sent this week against a weekly goal you set. Ask yourself:
- Where am I getting replies? Which roles, industries or title variations?
- Which resume versions are linked to interviews?
- What's slowing me down? Late follow-ups, missing postings, weak tailoring?
- What changes next week? New target companies, a stronger summary, better keyword coverage?
Moving your application tracker off a spreadsheet
If you've already been tracking in Google Sheets or Excel, you don't have to start over. In the ATSPrep tracker, open the menu and choose Import jobs, then paste rows from your sheet or pick a CSV file, such as an export from Notion, Teal or Huntr. You check the columns and a preview before anything is added, existing jobs are never replaced, and you can undo the import.
It works the other way too. Download as CSV takes your board back to a spreadsheet whenever you want it. The board lives in your browser, no account needed. Download a backup from Your data before you clear your browser or switch devices, or sign in to sync it.
Common application tracker mistakes to avoid
Even a well-built tracker loses its value when a few habits creep in. Most are easy to fix once you spot them.
- Too much complexity. Dozens of columns you never fill in.
- No resume link. Jobs logged without the version you sent.
- No review habit. Data entered once and never looked at again.
- Late updates. Stages left stale, so replies get missed.
- No file check. Sending a resume without seeing what a parser reads.
The best application tracker is the one you update every time you apply and review every week. Keep it simple enough that you will.
Put your tracker to work. Free, in your browser, no sign-up needed.
Sources and further reading
- Window: localStorage property, MDN Web Docs
Put it into practice on a real resume.
Each example is a complete resume with role keywords and bullets that show proof. Open one in the Studio and make it yours, no account needed.